


 | ||||||

How it Works
We are often asked... "What makes our product so superior?" We have a multi-step process that ensures you will have a premium and long lasting floor for years to come.
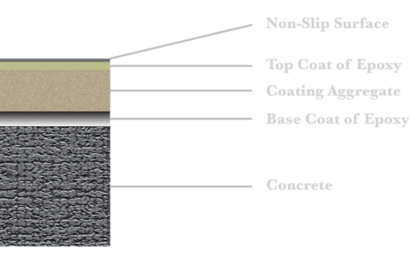
Step 1: Concrete Surface Preparation.
The construction of our floors are made up of three main layers. We start by first preparing your concrete surface with a slight sanding to expose a porous surface. We also prepare any areas of the concrete that may contain stains for thorough coverage. Oil spills, rust spots, you name it - they all can be completely covered as if they were never there.
Step 2: Epoxy Sealant and Primer Application
Next, we apply a special epoxy that acts both as a sealant and as a primer for the top finishing layers of our Armored Floors coating products.
Step 3: Aggregate Application
The aggregate coating is what gives Armored Floors that professional look. These aggregates gives your flooring texture and distinctiveness. Aggregates can be either granules that are similar to sand or flakes that provide that finished "Chip" look.
Step 4: Top Coat of Epoxy
In this step, a top coat of clear industrial strength epoxy is applied over the entire surface of the aggregate. The clear coat acts as a final seal to your concrete floors. It also provides that decorative look by giving a completely clear view of the aggregate.
Step 5: Non-Slip Surface Application
Finally, we apply a non-slip surface material settled into the epoxy top coat. This clear material is highly durable and provides a safe and skid free floor finish.


Armored Floors, Inc.
Give us a Call: 815-267-3004


Armored Floors
Give us a Call: 815-267-3004